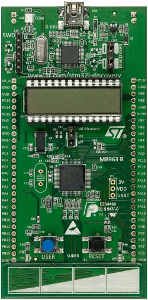
Getting started with an STM32L Discovery with Linux and GCC
I've got the "hello world" working on my STM32L Discovery board that I got about 8 months ago. It's not even the canonical blinking light, but it counts up and you only know that it works by using a debugger! Another site gave me the basic idea, but I needed a few changes to get it working.
1. Download the [Linaro bare metal ARM toolchain](http://www.linaro.org/downloads/) (it's near the bottom of the page).  Extract it somewhere (I put it in /opt).


2. Download and build [OpenOCD](http://openocd.sourceforge.net).  I'm using version 0.6.0.  I used [Checkinstall](http://checkinstall.izto.org/)so I had a managed package:


tar -zxvf openocd-0.6.0.tar.gz
cd openocd-0.6.0.tar.gz
./bootstrap
./configure --prefix=/usr --enable-jlink --enable-amtjtagaccel --enable-ft2232_libftdi
make
sudo checkinstall make install


3. Now something to compile.  I used this:


// By Wolfgang Wieser, heavily based on:
// http://fun-tech.se/stm32/OlimexBlinky/mini.php

#define STACK_TOP 0x20000800   // just a tiny stack for demo

static void nmi_handler(void);
static void hardfault_handler(void);
int main(void);

// Define the vector table
unsigned int *myvectors[4]
__attribute__ ((section("vectors"))) = {
    (unsigned int *) STACK_TOP,         // stack pointer
    (unsigned int *) main,              // code entry point
    (unsigned int *) nmi_handler,       // NMI handler (not really)
    (unsigned int *) hardfault_handler  // hard fault handler
};

int main(void)
{
    int i=0;

    for(;;)
    {
        i++;
    }
}

void nmi_handler(void)
{
    for(;;);
}

void hardfault_handler(void)
{
    for(;;);
}


4. Build it:


arm-none-eabi-gcc -I. -fno-common -O0 -g -mcpu=cortex-m0 -mthumb -c -o main.o main.c
I believe the -O0 is to stop the compiler optimizing out the counting loop.
5. Now for linking. The script on the other site didn't seem to work for me - when I started the debugger, it looks like it was trying to run code from memory address 0. From what I've seen, the flash actually lives at `0x02000000`, which might explain the problem. I found [another script at ChibiOS](http://chibios.svn.sourceforge.net/viewvc/chibios/trunk/os/ports/GCC/ARMCMx/STM32L1xx/ld/STM32L152xB.ld?revision=3846&view=markup)which seemed to work better. Download the script, then run the linker:


arm-none-eabi-ld -v -TSTM32L152xB.ld -nostartfiles -o demo.elf main.o


6. Now extract the binary image from the `.elf`:


arm-none-eabi-objcopy -Obinary demo.elf demo.bin
My binary is a whopping 52 bytes!
7. Before uploading the binary, the permissions on the Discovery board need changing, because only root can access it at the moment. Put this in `/etc/udev/rules.d/90-stm32ldiscovery.rules`:


ATTRS{idVendor}=="0483", ATTRS{idProduct}=="3748", MODE="0666"
This will give everyone write access to the Discovery. To apply the rules, run:
sudo service udev restart


8. Now to start OpenOCD, and upload the binary:


$ <strong>openocd -f /usr/share/openocd/scripts/board/stm32ldiscovery.cfg</strong>
Open On-Chip Debugger 0.6.0 (2012-09-15-16:06)
Licensed under GNU GPL v2
For bug reports, read
	http://openocd.sourceforge.net/doc/doxygen/bugs.html
adapter speed: 1000 kHz
srst_only separate srst_nogate srst_open_drain
Info : clock speed 1000 kHz
Info : stm32lx.cpu: hardware has 6 breakpoints, 4 watchpoints
In another terminal:
$ <strong>telnet localhost 4444</strong>
Trying 127.0.0.1...
Connected to localhost.
Escape character is '^]'.
Open On-Chip Debugger
> <strong>poll</strong>
background polling: on
TAP: stm32lx.cpu (enabled)
target state: halted
target halted due to breakpoint, current mode: Thread
xPSR: 0x01000000 pc: 0x0800001a msp: 0x200007f0
target state: halted
target halted due to breakpoint, current mode: Thread
xPSR: 0x01000000 pc: 0x0800001a msp: 0x200007f0
> <strong>reset halt</strong>
target state: halted
target halted due to debug-request, current mode: Thread
xPSR: 0x01000000 pc: 0x08000010 msp: 0x20000800
> <strong>flash probe 0</strong>
flash size = 128kbytes
flash size = 128kbytes
flash 'stm32lx' found at 0x08000000
> <strong>flash write_image erase demo.bin 0x08000000</strong>
auto erase enabled
target state: halted
target halted due to breakpoint, current mode: Thread
xPSR: 0x61000000 pc: 0x20000012 msp: 0x20000800
wrote 4096 bytes from file demo.bin in 0.325034s (12.306 KiB/s)
> <strong>reset</strong>
target state: halted
target halted due to breakpoint, current mode: Thread
xPSR: 0x01000000 pc: 0x08000010 msp: 0x20000800
> <strong>exit</strong>
Connection closed by foreign host.
I don't know what all of those commands do though!
9. Now to see whether the code is actually running:


$ <strong>arm-none-eabi-gdb demo.elf</strong>
GNU gdb (GNU Tools for ARM Embedded Processors) 7.3.1.20120613-cvs
Copyright (C) 2011 Free Software Foundation, Inc.
License GPLv3+: GNU GPL version 3 or later <http://gnu.org/licenses/gpl.html>
This is free software: you are free to change and redistribute it.
There is NO WARRANTY, to the extent permitted by law.  Type "show copying"
and "show warranty" for details.
This GDB was configured as "--host=i686-linux-gnu --target=arm-none-eabi".
For bug reporting instructions, please see:
<http://www.gnu.org/software/gdb/bugs/>...
Reading symbols from /home/damien/projects/stm32l-demo/demo.elf...done.
(gdb) <strong>target remote :3333</strong>
Remote debugging using :3333
main () at main.c:21
21	{
(gdb) <strong>cont</strong>
Continuing.
<strong>^C</strong>
Program received signal SIGINT, Interrupt.
main () at main.c:26
26	        i++;
(gdb) <strong>print i</strong>
$3 = 496378
(gdb) <strong>cont</strong>
Continuing.
^C
Program received signal SIGINT, Interrupt.
main () at main.c:26
26	        i++;
(gdb) <strong>print i</strong>
$4 = 903650
(gdb) <strong>quit</strong>
A debugging session is active.

	Inferior 1 [Remote target] will be detached.

Quit anyway? (y or n) <strong>y</strong>
Ending remote debugging.
Yay, it looks like it's running!
A program isn't of much use if it can't communicate outside of the chip, so driving I/O will be next. There looks like three options:
-
Write to the hardware directly. This involves looking through the CPU's user manual, and working out how to access the I/Os.
-
Use another library to access the hardware. This is much like how you write AVR code - you access all of the I/Os through C library calls. ST supplies a library, while it doesn't have a particularly nice license it's probably a good starting point.
-
Use a operating system like ChibiOS, which has support for this board. Having developed stuff for the AVR, I think it would be nice to have the resources of a real operating system - I wouldn't have to worry about implementing scheduling and interrupts myself.
Hopefully one day I'll try these out and get around to writing about the results!
My next post describes a what the code in this example does.
